Winter Shelters
Building a weather-proof, snug and inexpensive feral cat shelter
With a few supplies available at your local hardware or home store, you can quickly construct a snug shelter for your ferals! Follow the step-by-step illustrated instructions below.
Spay and Stay is indebted to the wonderful caretakers who took the time to photograph each step as they built this terrific shelter. Thank you Jim and Nancy!
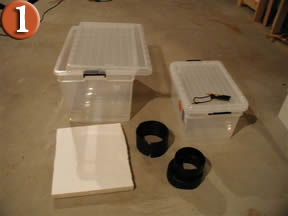
Materials needed:
Two Rubbermaid® or other brand sturdy storage boxes with lids, one smaller than the other (the smaller box should be large enough to house at least two cats comfortably)
Rectangle of insulation material, such as styrofoam, cut to fit inside the bottom of the large box
Flexible tubing, found at most hardward or home improvement stores, approximately 7" in diameter when closed
Utility knife sharp enough to cut through the plastic boxes
Block of wood or other sturdy cutting surface
Bale of straw (not shown)
Marker that will write on plastic
Hair dryer
Assembly instructions:
Assemble your materials. Shown here: 2 storage boxes, insulation material (styrofoam), tubing, utility knife or saw.
Place the insulation material into the bottom of the larger box.
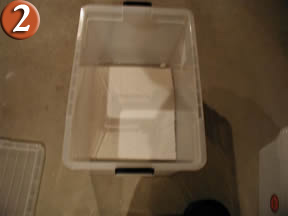

Place the smaller box inside the larger box and make sure the lid of the outer box will still close.
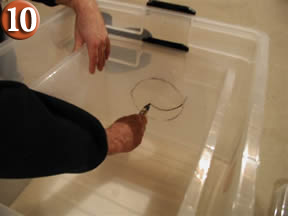
Locate your flexible rubber tubing material.
Overlap the ends of the flexible rubber tubing material so that it forms a circle. You may want to clip the overlapped ends together to hold the tube in a circular shape for now. The circle should be large enough for a cat to get through, but not a raccoon or other similarly-sized animal. Remember: cats can easily squeeze through tiny spaces!


Place the circular tubing at one end of the smaller plastic box, a couple inches up from the bottom of the box.
Use the black marker to trace around the circular tubing. Heat area to be cut with blow dryer to make cutting easier. Once cut, this circle will be the entry into the shelter. A small opening is perfect for cats.


Place the end of the plastic box over a piece of wood, heat area with blow dryer, and use the utility knife to cut out the circle.


You may need a small saw to finish the job.
Place the smaller box inside the large one, and use the cut-out circle to trace the same size circle on one end of the larger box. Cut the circle out of the larger box as in Steps 8 and 9 above.
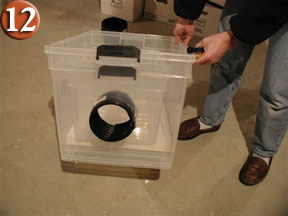
Place the smaller box inside the larger box and line up the cut-out circles. Squeeze the flexible plastic tubing together and pass it through both circles, making sure it fits snugly.

The tubing should stick out of the outer box a few inches. That way the entryway also serves as a wind break and water shield.
Line the bottom of the smaller box with dry, clean straw. The cats burrow into the straw for warmth. Do not use towels or any other fabric; it will stay wet and freeze.


Pack the spaces between the two boxes with more straw for additional insulation.
Put the lid on to the smaller inside box, then cover it with plenty of straw. Finally, snap the lid on to the larger outer box.


Your shelter is ready! Place it in a secure place against a sturdy wall or structure. You can also place it under a porch or deck and surround it with bales of straw for added protection from the cold and winter wind.
How to Build a Snug Wooden Winter Shelter
Download the instructions from Alley Cat Allies for building this and many other shelters.

How to Build a Snug Styrofoam Shelter

Neighbhorhood Cats has instructions for building an easy-to-make Styrofoam shelter.
Each 4-ft x 8-ft piece of styrofoam makes two shelters. If you only need one, we'd love to have the other one so we can pass it along to another caretaker who needs shelter for their colony. Thanks to Neighborhood Cats for this great photo.